How to: Make Your Own-made Movie, Watch it on iPod and Share it with Others? - Mp4 Converter
How to make your own-made movies? Many dudes must think it unbelievable when they have a glance at this topic. But it's true. The present popular video podcast could help you realize your dream, to make your own-made film. Only with a digital video camera and Apple's iMovie HD, anyone with the inclination and the creativity can become a movie producer.
Thanks to iTunes' built-in Podcasting features, finding and downloading video Podcasts (also known as vlogs, vidcasts, and vodcasts) has never been simpler. In fact, a whole section of the iTunes Music Store is dedicated to video Podcasts. Better still, subscribers with video-capable iPods can enjoy your movies on buses and planes.
Step 1: Prepare the footage
You can use any digital video files on your Mac to create a video Podcast. But if you want the movie to look good on the iPod's 2.5-inch screen or on the tiny player within iTunes, you'll need to keep a few things in mind as you shoot and edit:
Get Close When you're shooting your movie, avoid wide shots with lots of details. Most of these details will be lost on the video iPod's small screen. Instead, focus on getting close-up shots of your subject. You should also avoid shooting in wide-screen (16:9) mode; doing so results in black borders above and below your image and makes details appear even smaller. Shoot in standard (4:3) mode instead.
Think Small Want to add titles to your movie? Although iMovie includes a nice selection of titling options, most of them are too small to read on the video iPod's screen—even at their maximum settings. For more-legible titles, consider investing in GeeThree's Slick Transitions and Effects Volume 3 plug-in ($50), which provides a broader range of size options.
If you're willing to forgo motion effects, such as scrolling text, you can also create your own titles in a graphics program such as Adobe Photoshop. Create a 200-by-200-pixel document, design your text, and then import the image into iMovie.
Keep It Short Most people don't have the time - or the battery power - to watch a full-length feature film on an video iPod, so keep your masterpiece short. A very popular video Podcast, Tiki Bar TV (free), limits episodes to about five minutes. As an added benefit, keeping your video short will save on download time for your viewers and on bandwidth costs for you. Even when scaled down for the video iPod, a seven-minute movie can take up as much as 40MB.
Step 2: Zip the file
Before you finished, you'll need to optimize it for the video iPod's screen.
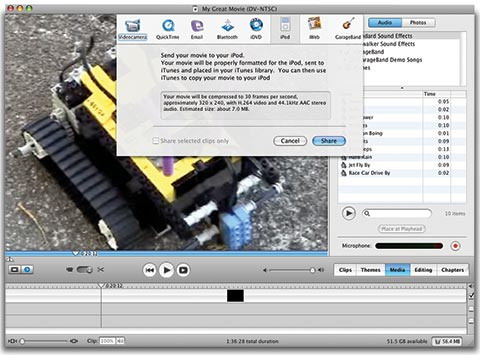
With the latest version of iMovie HD (part of Apple's iLife '06 suite), exporting your Podcast is a snap. Go to File: Export, click on the iPod tab, and then click on the Share button (see screenshot). iMovie converts the file and places it in your iTunes library.

If you're using the previous version of iMovie HD (from iLife '05), you need to create a custom preset for the exported file. (The built-in preset has a bug that makes exported movies appear stretched on the iPod's screen.) Go to File: Share, click on the QuickTime tab, and choose Expert Settings from the Compress Movie For pull-down menu. Click on the Share button. In the Save Exported File As dialog box, click on Options. Choose Use Custom Size from the Size menu and type 320 and 240 in the Width and Height fields, respectively. When you click on the Save button, iMovie will export an iPod-compatible version of your movie. Then you can watch your own-made movie on your video iPod.
If you don't have iMovie HD, or if you just want to quickly convert finished video files without opening them in iMovie, you can use Splasm Software's Podner ($10) to do the same thing.
Step 3: Add descriptions
Once the file has been converted, drag it into iTunes (if you're not using the latest version of iMovie HD) and press Command-I to open the Get Info window. Click on the Info tab and fill in the Name field (in this case, use the title of your video), Artist field, and so on. All this information will help viewers find your Podcast once they've imported it into iTunes. When you're done, click on OK. Then press Command-R to bring up the file in a new Finder window. From here, change the file's name to better reflect its contents—for example, videoPodcast-2006-04-020.m4v.
Although it isn't required, you should also consider adding cover art for your Podcast. This could be a photo, a still from the video, or a simple icon—anything that represents you or your Podcast. The standard cover art size is 150 by 150 pixels, so don't pick a very large image. Once you've selected your art, use an image editor to crop it into a square. In iTunes, select your Podcast and press Command-I. Click on the Artwork tab and then on the Add button. Navigate to your image file and click on Choose.
Step 4: Show your movies to others
You're now ready to upload the file to a Web server. Many ISPs offer free Web space for customers. If yours doesn't, you can usually pay a small fee to have another company host your video files. Got a .Mac account? Just upload the file to your Sites folder.
To make your audio file easily accessible to others, you need to create an RSS (Really Simple Syndication) feed for it. Think of RSS as your site's PR agent. Anytime you make a new post, this code sends out a summary to RSS news readers, such as the ones built into Safari and iTunes.
Make a Blog The easiest way to get an RSS feed is to create a Weblog. iWeb, Apple's new Web design software (included with iLife '06), makes this process incredibly easy (see Your One-Stop Weblog below). However, you can use any blogging software to set up your Weblog. Blogger (free) is particularly easy to set up. It takes about five minutes to create a blog using the on-screen instructions.
Once the blog is up and running, go to www.feedburner.com to attach video or audio to your posts. Enter your blog's address, select the I Am A Podcaster option, and click on Next. If you use Blogger, your address will look something like this: myblog.blogspot.com. On the Welcome page, create a user name and password, and then click on Activate Feed.
On the Congrats page, you'll see the address for your blog's new RSS feed. Write this down—you'll need it later. Click on Next to move to the Set Up Podcast page. Set the Create Podcast Enclosures From Links To menu to Video Files Only, and activate the Include iTunes Podcasting Elements option. Finally, fill in the appropriate information about your Podcast, including a category for its content.
Return to your log and create a new entry. Add a brief message with details about the content of your video Podcast, as well as any technical information, such as file size. Then add a link to the video file on your Web server.
Step 5: Publish your video podcast
You can publicize your Podcast at Podcast Alley and the iTunes Music Store.
At Podcast Alley, click on the Add A Podcast link at the top of the page and enter the appropriate information, including the title of the Podcast and the address of the RSS feed you created in FeedBurner.
To promote your video Podcast in iTunes 6, open the iTunes Music Store and select Podcasts from the menu on the left. When the Podcast page appears, click on Submit A Podcast. Enter the address of the RSS feed you created in FeedBurner in the Podcast Feed URL text box. Your new Podcast should be up on iTunes within a day or two. When it is, people can search for it from within iTunes.
Last Step: Submit your podcast to the web
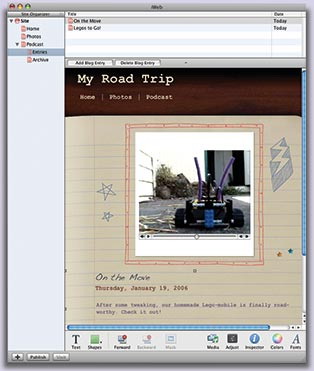
iWeb, the newest member of Apple's iLife, greatly simplifies the process of creating and distributing a video Podcast.
When you launch iWeb, select a Podcast page from any of the template styles. When you use this type of page, iWeb automatically retrieves your video Podcast and creates an RSS feed for it.
If you're using iMovie to edit your Podcast, go to File: Export, click on the iWeb icon, and then click on the Share button. iMovie will send it to iWeb for publication. Add your own text to the iWeb layout, including a title, show notes, and credits. Then go to File: Submit Podcast To iTunes to list your video Podcast in the iTunes Music Store's Podcast directory. Fill out the appropriate information, and then click on the Publish And Submit button to upload your Podcast to your .Mac account.
If you don't have a .Mac account, don't despair. You can publish your iWeb pages, including video Podcasts and RSS information, to any Web server. From the File menu, select Publish To Folder. iWeb places all the necessary files within your user folder's Sites folder. From there, you can use any FTP program to upload them to the host of your choosing. You will lose a few features by not publishing to .Mac—namely, the automatic listing in iTunes and photo slide shows—but for the most part, the pages will be identical.

Featured Guides
Guides Categories
Video/Audio Guides
- 4Media Audio Converter Pro Tutorial
- 4Media Movie Editor 6 Tutorial
- Video Converter Ultimate Tutorial
- How to convert DAT to other videos
DVD/CD/Blu-Ray Guides
- 4Media Blu Ray Converter for Mac Tutorial
- How to convert Blu-ray disc to video files
- How to burn AVI, MPEG, VOB, DAT, M2V, MPG to DVD on Mac
- How to burn DivX to DVD on Mac
iPod Guides
- 4Media iPod Max Guide
- How to convert AVI, MPEG to iPod MP4 format
- Guide: 4Media iPod to PC Transfer
- How to convert DVD to iPod on Mac
iPhone Guides
- 4Media iPhone Contacts Transfer for Mac Tutorial
- 4Media iPhone Contacts Transfer Tutorial
- 4Media iPhone Ringtone Maker for Mac Tutorial
- 4Media iPhone Max Guide
iPad Guides
Youtube/Online Video Guides
- 4Media Online Video Converter for Mac Guide
- 4Media Online Video Downloader for Mac Guide
- 4Media Online Video Converter Guide
- 4Media Online Video Downloader Guide
PPT/PDF Guides
Others
Articles
- How to download YouTube videos for free
- How to download/convert YouTube videos to iPod
- How to download and convert YouTube videos
- All features of apple iPhone
- Now you can get more TV offerings from Apple iTunes
- Video Streamer HAVA from Snappy Multimedia
- iPod Growth Driving Demand for Flash Memory
- MediaMan HVX-3500 Review
- Uncertain whether new iPod will be delayed or not because of hurdles
- T3's top five iPod alternatives
- Envivio Exhibits MPEG-4 Solutions from Mobile to HD at CCBN2006

